I’ve decided to ‘take the plunge’ and use my old trusty MacBook Air as a single boot Linux box. I got a shiny new MBA, so I figured it could be fun to go ahead and make a ‘beater’ machine out of my old one so I could toss in my bag and skate around town without worrying about ruining my sweet new laptop.
This is an overview of the things I did to get Xubuntu up and running in a workable fashion on my old MacBook Air (3,1).
Why Xubuntu?
I decided against Ubuntu’s default Unity desktop because I worried the 2GB of RAM would be pushed too hard with all the fancy doodads. Mac OS X Yosemite was running rather slow on this 5 year old computer after the last update, so, the little laptop’s age was showing.
XFCE, the X in Xubuntu, is a lighter weight desktop environment, making it faster, although less polished. No shadows here, but, that’s hardcore, right? Whats the point of running Linux on a tiny laptop other than to be hardcore?!
Setup
Install
Before installing, use Disk Utility to make 2 partitions: one for your personal files and one for the operating system. I made my personal file partition larger than the OS partition because I know thats where the bulk of all the things will go. Do what you will, but make your choice wisely because if you want to resize it later, you might just b0rk your machine.
Anyway, make a bootable USB drive with Xubuntu. I use UNetbootin. Just follow the directions and everything should be okay. I use the LTS (Long Term Support) version of the OS (at time of writing, 14.04) because, in my experience, its the most stable. Ubuntu comes out with an LTS every two years and they are pretty solid. If you want to be extra bonus hardcore, you can install the bleeding edge version, but beware that it might cause you more trouble than its worth.
Luckily, with an old MBA and its limited hardware configurations, you don’t have to worry about some obscure piece of hardware not being supported. If its a newer MBA, you might have to worry a little more. If its the newest you should probably expect something to not work.
But, really, its all supposed to be “for fun”.
Ubuntu has a whole wiki section to cover “Mactel” things so check it out before going much farther.
After you make the USB boot drive, turn off the laptop. Restart while holding down the option key and it should show you a fancy screen with your Macintosh HD as two drives and a yellow bootable USB drive. Pick the USB drive… unless you want to go back to OS X, which you don’t because you are trying to install Linux.
You should get a screen that asks if you want to install Linux or try it out. Do what you want, but when you feel ready, select install and follow all the directions. At some point very soon to the beginning, it will ask what you want to do with all your partitions. Pick the partition you want to install the OS onto and move on.
You’ll be asked to create a username and password and whether or not you want your home directory to be encrypted. It will also ask you (either before or after the username thing, I don’t remember) if you want to install updates and 3rd party software all at the same time. Select those options, its convenient.
When its all done, restart and behold your new OS.
Keep your /home directory in a separate partition
This is where that partition you made earlier comes in handy. Keeping your /home directory in a separate partition means you can re-install the OS if you happen to break anything and not have to worry about your personal configuration files and other such important things. It’ll all be there, waiting for that bleeding edge version of Xubuntu to greet it upon login.
Follow these directions super carefully
You can play around with the OS and try to customize it and stuff right away, but I suggest you move your /home directory first. Its faster to do it now because your /home is fresh and new.
Disable trackpad when using keyboard
When using OS X, you’ve never had to worry about losing cursor focus due to a slight brush of your palm on the trackpad. That’s quality. Xubuntu is free software that allows a user to configure it all they want, which means you have to think about things like this.
But, as free software that anyone can work on, some brilliant dev somewhere was plagued with this trackpad typing focus bug and created a fix.
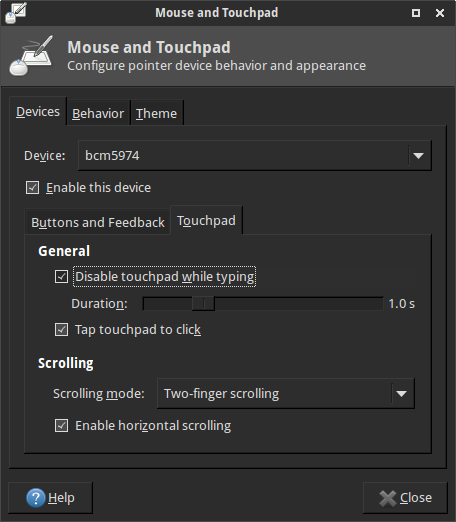
Go to the ‘Whisker Menu’ (the little mouse at the top left side of the screen), click on ‘Settings’ to the bottom-ish right of the menu, and then select ‘Mouse and Touchpad’. Look over the ‘Buttons and Feedback’ tab and tweak as you want, then select the ‘Touchpad’ tab and check ‘Disable touchpad while typing’. Overtime, you might need to adjust the ‘Duration’ until it feels right to you.
Keyboard shortcuts
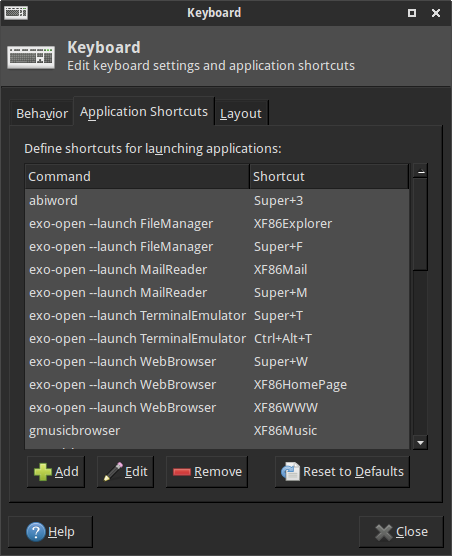
All keyboard shortcuts are customizable via the Keyboard section of Settings (in the Whisker menu like above, OR just hit Super+r and type in ‘keyboard’). Hit ‘+add’ to make a new shortcut, or ‘edit’ to change an existing one, or ‘delete’ if you hate one. When addng, it will prompt you to type in the command you want it to run. (What is this?! What does it mean?! How are you supposed to know what commands are available?!) Enter the command you want and hit ‘OK’ and it will ask you to hit the keyboard shortcut combo you want to use to run that command. Easy peasy.
Its important to node that the command / apple key is the ‘Super’ key.
option+tab - switch open apps
super+r - much like Spotlight
ctrl+tab - switch between open tabs
CLI commands to note
Open current working directory thunar . in the file manager GUI.
Also, of course, sudo apt-get install <something>, but that will have to be a Google search for you.
XFCE theme manager
You can make Xubuntu look awesome, or horrible, its all up to you.
Applications
Sometimes, you’ll want to download something familiar and useful that isn’t included in the software center or apt-get. For example, lets say you want to install Dropbox and it tells you to install something called a .deb, go for it. Just download it and run it in the software center app.
NOTE - chrome is available like this and is kind of buggy. I currently changed my ‘Web Browser’ shortcut to run google-chrome --disable-gpu in order to avoid weird GPU things.
Power optimizations
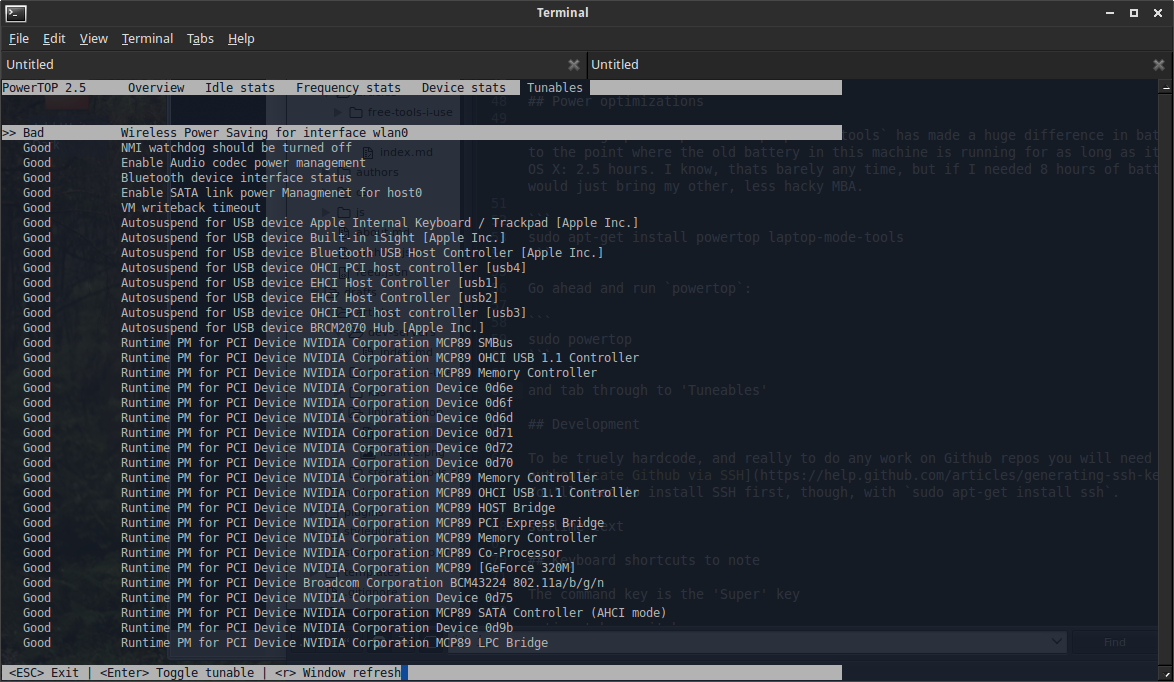
Installing powertop and laptop-mode-tools has made a huge difference in battery life, to the point where the old battery in this machine is running for as long as it did with OS X: 2.5 hours. I know, thats barely any time, but if I needed 8 hours of battery life, I would just bring my other, less hacky MBA.
sudo apt-get install powertop laptop-mode-tools
Go ahead and run powertop:
sudo powertop
and tab through to ‘Tunables’ and hit enter when you find something that appears to need tuning.
Development
To be truely hardcore, and really to do any work on Github repos you will need to authenticate Github via SSH. You’ll need to install SSH first, though, with sudo apt-get install ssh.
Sublime Text 3 is available as a .deb and works exactly as it does everywhere.
Jetbrains has its IDE’s available as well, if you have a license for some of their goodness.
Naturally, you could just Vim or Emacs like a pro with some tmux thrown in.